Configuring WebRTC
To support WebRTC, you need to perform special configuration settings for the device's SBC leg interfacing with the WebRTC client (i.e., Web browser).
For the WebRTC deployment environment, you need to install a signed certificate by a Certificate Authority (CA) on you Web server machine (hosting the WebRTC JavaScript) and on your AudioCodes SBC device (i.e., WebSocket server).
|
●
|
Google announced a security policy change that impacts new versions of the Chrome Web browser. Any Web site that has integrated WebRTC, geolocation technology, screen-sharing and more, now requires to be served from a secure (HTTPS) site, including WebRTC-based WebSocket servers (WSS instead of WS). The configuration described below accommodates for this basic requirement. |
|
●
|
WebRTC JavaScript configuration is beyond the scope of this document. |
|
●
|
The device's WebRTC feature (WebRTC Gateway) can also operate with mobile device users that are registered to the device's WebRTC service, allowing them to make and receive WebRTC calls between registered users. For this support, you can use AudioCodes WebRTC client Software Development Kit (SDK) and Application Program Interface (API) to integrate the WebRTC functionality into the mobile applications (iOS and Android). For more information, refer to the following documents: |
|
✔
|
WebRTC iOS Client SDK API Reference Guide
|
|
✔
|
WebRTC Android Client SDK API Reference Guide
|
|
●
|
For integrating the device's WebRTC functionality into client Web browsers for making calls from their Web browsers through the device, you can use AudioCodes WebRTC client Software Development Kit (SDK) and Application Program Interface (API). For more information, refer to the document WebRTC Web Browser Client SDK API Reference Guide. |
|
●
|
You can implement the device's WebRTC widget, which can be embedded in websites and blogs without any
previous knowledge of JavaScript. The widget creates a click-to-call button on your website. It can make calls to any user that is registered with the device. For more information, see the WebRTC Click-to-Call Widget Installation and Configuration Guide. |
|
●
|
You can also implement voice quality (MOS) measurement and reporting by the device per registered WebRTC client (user). This also includes configuring actions to take (reject calls or use an alternative IP Profile with a more efficient voice coder) when MOS measurements are low. For more information, see Configuring Voice Quality for Registered Users. |
|
1.
|
Configure a TLS Context (certification): |
|
b.
|
Add a new TLS Context (e.g., "WebRTC") or edit an existing one, and then configure the 'DTLS Version'
parameter to the desired DTLS version. |
|
c.
|
Create a certificate signing request (CSR) to request a digitally signed certificate from a Certification Authority (CA). |
|
d.
|
Send the CSR to the CA for signing. |
|
e.
|
When you have received the signed certificate, install it on the device as the "Device Certificate" and install the CA's root certificate into the device's trusted root store ("Trusted Certificates"). |
For more information on CSR, see Assigning CSR-based Certificates to TLS Contexts.
|
2.
|
Configure the keep-alive interval with the WebSocket client: |
|
a.
|
On the Transport Settings page (Setup menu > Signaling & Media tab > SIP Definitions folder > Transport Settings), and then in the 'WebSocket Keep-Alive Period' field (WebSocketProtocolKeepAlivePeriod), enter the keep-alive interval: |

|
3.
|
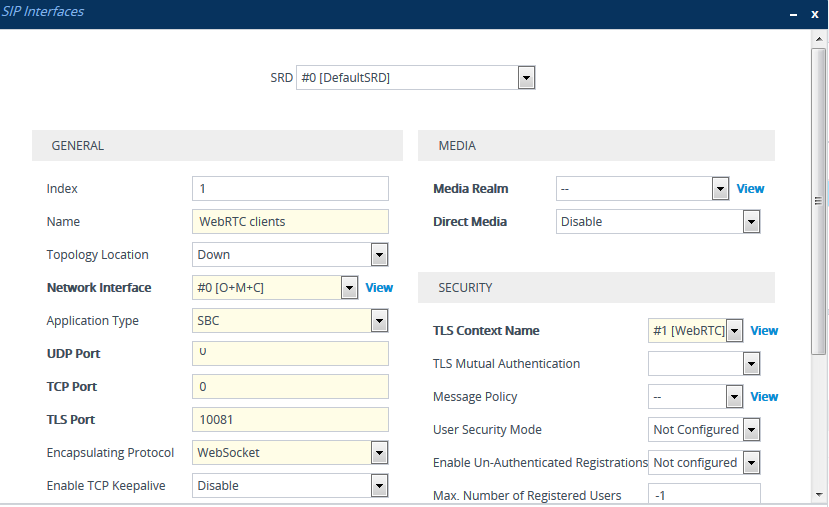
Configure a SIP Interface for the WebRTC clients that identifies WebSocket traffic: |
|
◆
|
From the 'Encapsulating Protocol' drop-down list, select WebSocket. |
|
◆
|
In the 'TLS Port' field, configure the TLS port. |
|
◆
|
From the 'TLS Context Name' drop-down list, assign the TLS Context that you configured in Step 1 (e.g., "WebRTC"). |

|
4.
|
Configure an IP Profile for the WebRTC clients: |
|
◆
|
From the 'SBC Media Security Mode' drop-down list
, select Secured: |

|
◆
|
From the 'SBC Media Security Method' drop-down list, select DTLS to secure and encrypt media traffic through DTLS for SRTP key exchange: |

|
◆
|
From the 'ICE Mode' drop-down list, select Lite or Full to enable ICE:
|

|
◆
|
From the 'RTCP Mux' drop-down list, select Supported to enable RTCP multiplexing: |

|
◆
|
From the 'RTCP Feedback' drop-down list, select Feedback On to enable RTCP feedback: |

|
◆
|
From the 'Re-number MID' drop-down list, select Enable to enable the device to change the value of the 'a=mid:n' attribute (where n is a unique value) in the outgoing SDP offer (if the attribute is present) so that in the first media ('m=' line) the value will be 0, the next media the value will be 1, and so on. |

If the peer side also uses the 'mid' attribute in RTP extensions (e.g., a=extmap:3 urn:ietf:params:rtp-hdrext:sdes:mid), you also need to enable the 'Re-number MID' parameter for the IP Profile of the peer side.
|
◆
|
In the 'RFC 2833 DTMF Payload Type'
parameter, enter payload type "126": |

|
◆
|
From the 'RTCP Mode' drop-down list, select Transparent: |

|
5.
|
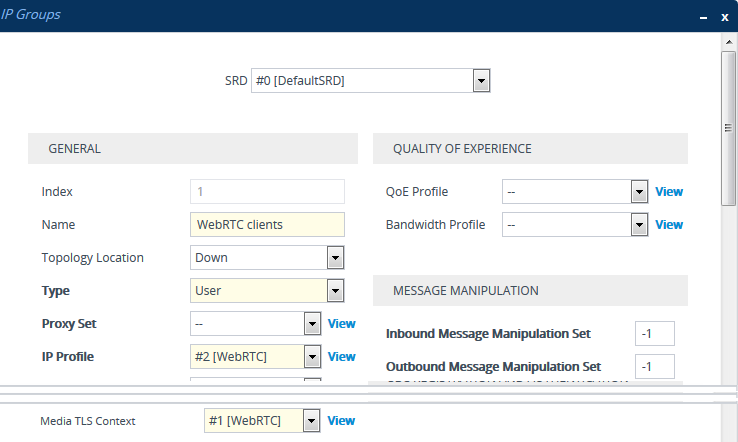
Configure an IP Group for the WebRTC clients: |
|
◆
|
From the 'Type' drop-down list, select User. |
|
◆
|
From the 'IP Profile' drop-down list, select the IP Profile that you configured for the WebRTC clients in Step 3 (e.g., "WebRTC"). |
|
◆
|
From the 'Media TLS Context' drop-down list, select the TLS Context that you configured in Step 1. For more information on DTLS, see SRTP using DTLS Protocol. |

|
6.
|
Configure IP-to-IP routing rules to route calls between the WebRTC clients and the enterprise: |
|
b.
|
Configure routing rules for the following call scenarios: |
|
◆
|
Call routing from WebRTC clients (IP Group configured in Step 4) to the enterprise. |
|
◆
|
Call routing from the enterprise to the WebRTC clients (IP Group configured in Step 4). |
|
7.
|
Enable the device to include all previously negotiated media lines ('m=') in the SDP offer-answer exchanges for the WebRTC session: |
|
a.
|
Open the Media Settings page (Setup menu > Signaling & Media tab > Media folder > Media Settings). |
|
b.
|
Under the SBC Settings group, from the 'Enforce Media Order' drop-down list (SBCEnforceMediaOrder), select Enable: |


